Before you start
Open the map and frame the area you want to annotate. Shapes are visual annotations, not surveyed boundaries.
Follow along
Step 1 of 5Upload an image
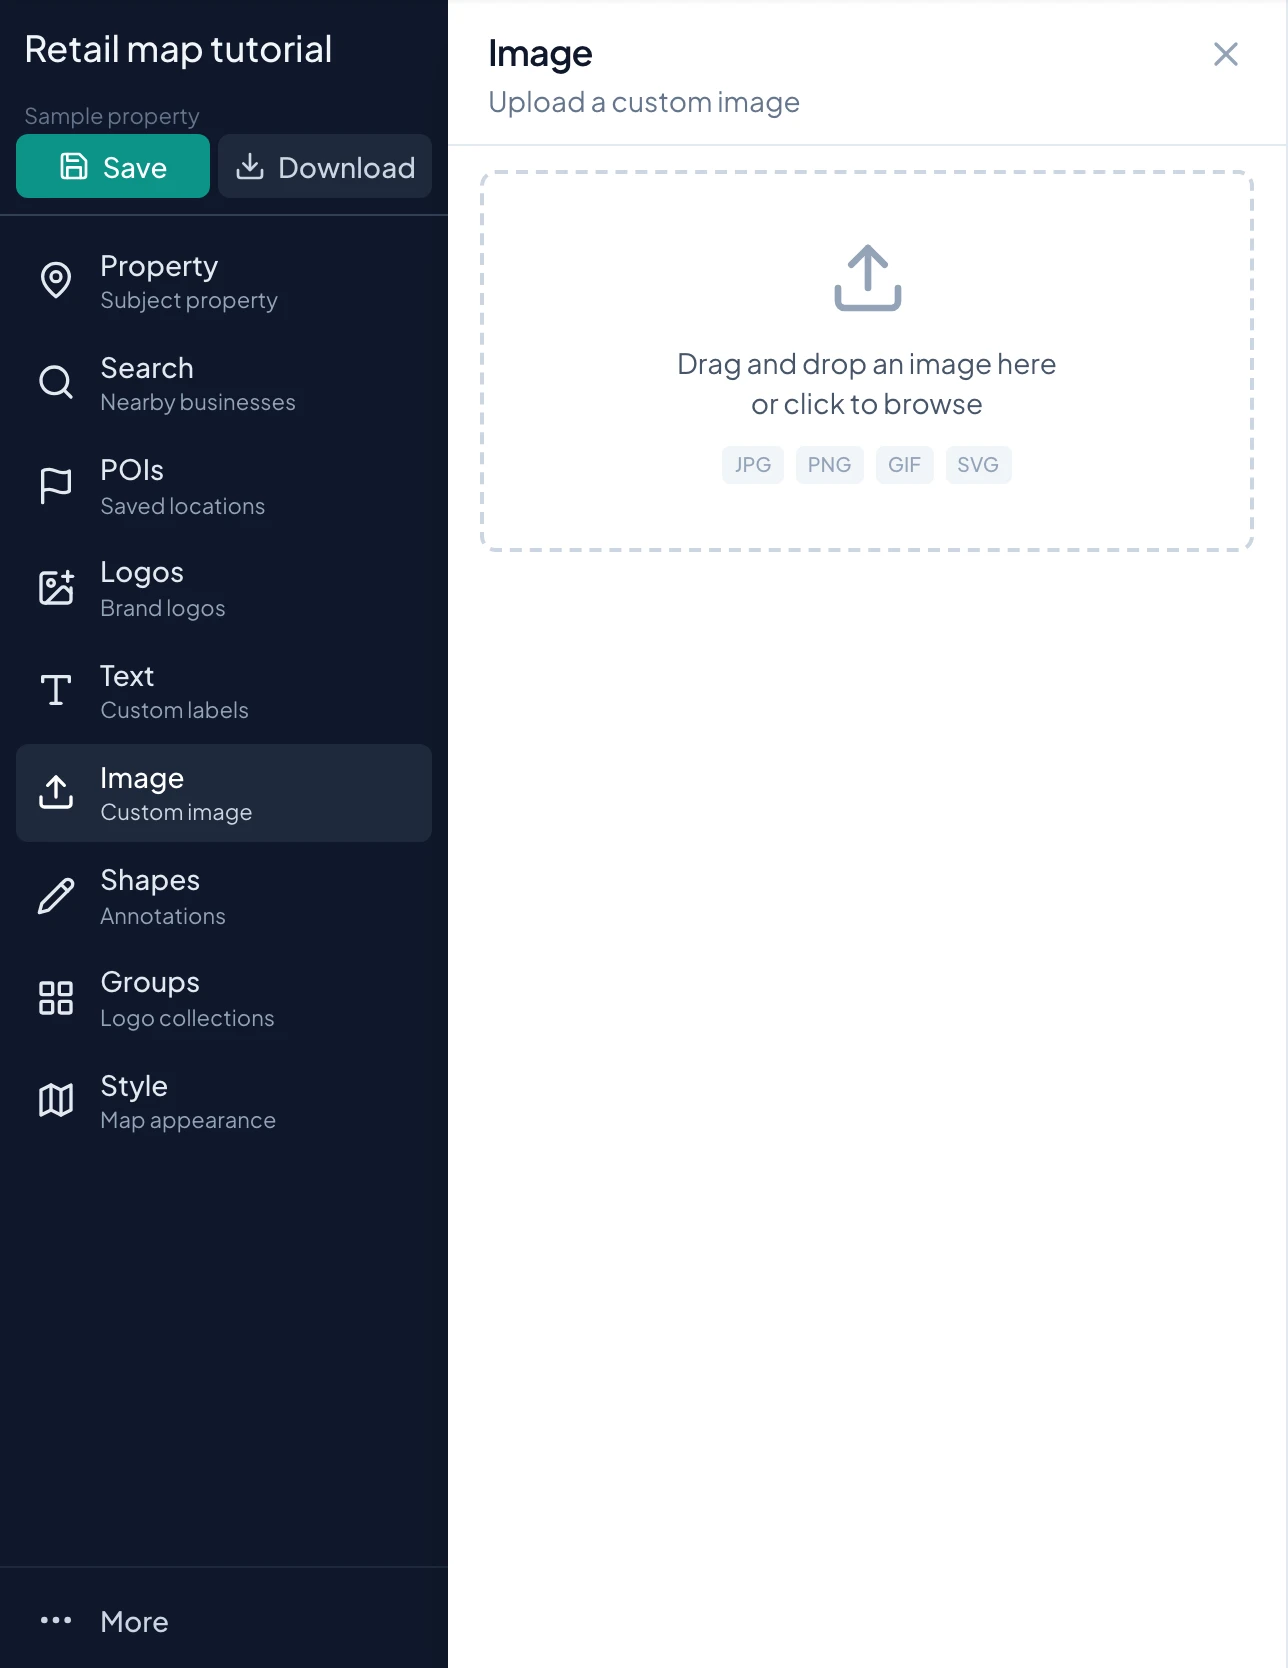
Open Image and choose your image file. Select one image of 10MB or less, or drop it into the upload area. The panel closes when the file is accepted. Drag and resize the placed overlay.
How-to 1
Upload and place a custom image
- 1
Prepare the file
Use a clear image of 10MB or less. The upload panel lists JPG, PNG, GIF, and SVG. For a logo, a tightly framed source usually fits better than an image with large empty margins. Prepare any crop before uploading if you need a different composition.
- 2
Open Image
Click Image in the sidebar. Click the upload area to browse, or drag one file into that area. The panel accepts the first selected or dropped file; add additional images one at a time.
- 3
Find the placed image
Once accepted, the upload panel closes and the image is added to the map. There is no separate Add Image confirmation in this panel. Wait for it to appear, then drag it into position and resize it.
- 4
Style the container
Reveal the image controls and use Edit style. Set Container Style, including fill, border, opacity, and padding, then Save Changes. Use a backing if the image disappears against the base map.
How-to 2
Choose the right shape tool
These are presentation annotations. Drawn areas do not establish a surveyed boundary, calculate acreage, or create a drive-time analysis. Start with the 2D map when you need to follow a footprint or a particular route.
| Shape | Drawing gesture in 2D | Typical use |
|---|---|---|
| Rectangle | Click and drag, then release. | Highlight a roughly rectangular site or parking area. |
| Circle | Click and drag, then release. | Emphasize a location or surrounding area visually. |
| Polygon | Click each point, then double-click the final point. | Trace an irregular visual boundary. |
| Line | Click points, then double-click to finish. | Draw a route or linear annotation. |
| Arrow | Drag from the start toward the endpoint. | Show one direction of access or movement. |
| Double Arrow | Click and drag between the endpoints. | Illustrate two-way movement or a span. |
How-to 3
Set the drawing style before choosing a tool
- 1
Frame the area
Pan and zoom until the feature you want to annotate is visible. Make room for both endpoints if drawing an arrow. Once drawing is active, map gestures are used by the selected tool.
- 2
Open Shapes and choose colors
Set fill color and opacity, then stroke color and width. Use a transparent or light fill when buildings and roads need to remain visible. An outline needs a visible stroke to stand out.
- 3
Select the shape last
Click the shape type after setting its appearance. The panel closes and a drawing banner appears. The banner tells you whether to drag or click points and provides Cancel (Esc).
How-to 4
Draw and refine an area annotation
- 1
Draw a rectangle or circle
Choose the tool, press on the map, drag to the desired extent, and release. Inspect the shape before starting another. A filled shape can obscure underlying labels, so review both its size and opacity.
- 2
Trace a polygon
Choose Polygon. Click the first corner, then each additional corner in order. The in-progress segment follows your pointer. Double-click the final point to finish; at least three points are needed. Avoid crossing edges unless that shape is intentional.
- 3
Cancel an unfinished drawing
Press Escape or click Cancel (Esc) in the drawing banner. This returns you to normal map interaction. Start the tool again if the first points were placed incorrectly.
- 4
Select the completed shape
Click the shape to reveal its editing controls and available geometry handles. Move or adjust it as supported by that shape, then click the map to deselect. Save and reopen after geometry changes to confirm the result you intend to keep.
How-to 5
Draw a line or directional arrow
- 1
Use Line for a path with bends
Choose Line and click the successive path points. Double-click the endpoint to finish. At least two points are required. Use as few vertices as needed to keep the annotation easy to read.
- 2
Use Arrow for one direction
Choose Arrow and drag toward the intended endpoint. Check the direction of the arrowhead after releasing. For an access diagram, point to the entrance you mean, not simply toward the general center of the site.
- 3
Use Double Arrow for both directions
Choose Double Arrow and drag between the endpoints. Inspect both ends and make sure the drawing does not imply a measured distance unless you independently supply that information.
- 4
Fix an incorrect annotation
Click the completed shape and use the available controls to adjust it. If a path or direction is wrong, deleting and redrawing can be clearer than trying to disguise the error with a different color.
How-to 6
Edit or remove a completed shape
- 1
Open Edit Shape
Click the shape, then its edit control. The Edit Shape dialog provides Fill Color, fill Opacity, Stroke Color, stroke Opacity, and Stroke Width, with a preview of the style.
- 2
Separate fill from stroke
Use fill opacity to control the interior and stroke opacity to control the edge. Setting fill to zero can create an outline treatment. A line uses its stroke, so changing an area-fill color will not produce the same visible effect on every shape.
- 3
Save the appearance
Click Save Changes and inspect the shape on the map. If it competes with logos, lower the emphasis or adjust the placement. Use the selected shape's delete control when it is no longer needed.
How-to 7
Use shapes in 3D and check the final output
The 3D workflow differs from 2D drawing. Choosing a shape in 3D adds a starter annotation at the current 3D camera center. Use the 3D selection and editing controls to position and style it. For an accurately traced visual outline, prepare the geometry in 2D before switching views.
For a site-access example, draw a low-opacity polygon over the intended area and a separate arrow pointing to the driveway. Add a Text label for the access note. In the export preview, check that the arrowhead, boundary, image artwork, and text remain readable together.
Check your result
Your annotation highlights the intended area or direction while the underlying map stays readable.
Tips and troubleshooting
- The shape tool closes the panel when selected. Set the style first or edit the completed shape afterward.
- If the map is still drawing instead of panning, press Escape.
Read the quick walkthrough as text
- Upload an image. Open Image and choose your image file. Select one image of 10MB or less, or drop it into the upload area. The panel closes when the file is accepted. Drag and resize the placed overlay.
- Prepare a shape. Open Shapes. Set the fill, opacity, stroke color, and width before choosing a shape tool.
- Draw a rectangle, circle, or arrow. Choose Rectangle, Circle, Arrow, or Double Arrow. Click and drag across the map, then release to finish.
- Draw a polygon or line. Choose Polygon or Line. Click to add points and double-click the final point to finish. A polygon needs at least three points; a line needs two. Press Escape to cancel unfinished drawing.
- Refine the result. Use the shape editing controls to change its style. Recheck the annotation against the map at your final zoom level.
Explore the retail map software overview for the full workflow.