Before you start
Open the map you want to annotate. Have the final label text ready.
Watch: Type a label and choose a text preset
Silent screen recording with captions. Sample project, current editor controls.
Read the video transcript
Open Text. Enter AVAILABLE 2,400 SF in Label text. Select Pro to preview the preset. Expand Customize style to see font and container controls. To place the label after this demonstration, click Add Text.
Follow along
Step 1 of 5Enter your label
Open Text and type in Label text. For this walkthrough, enter AVAILABLE 2,400 SF.
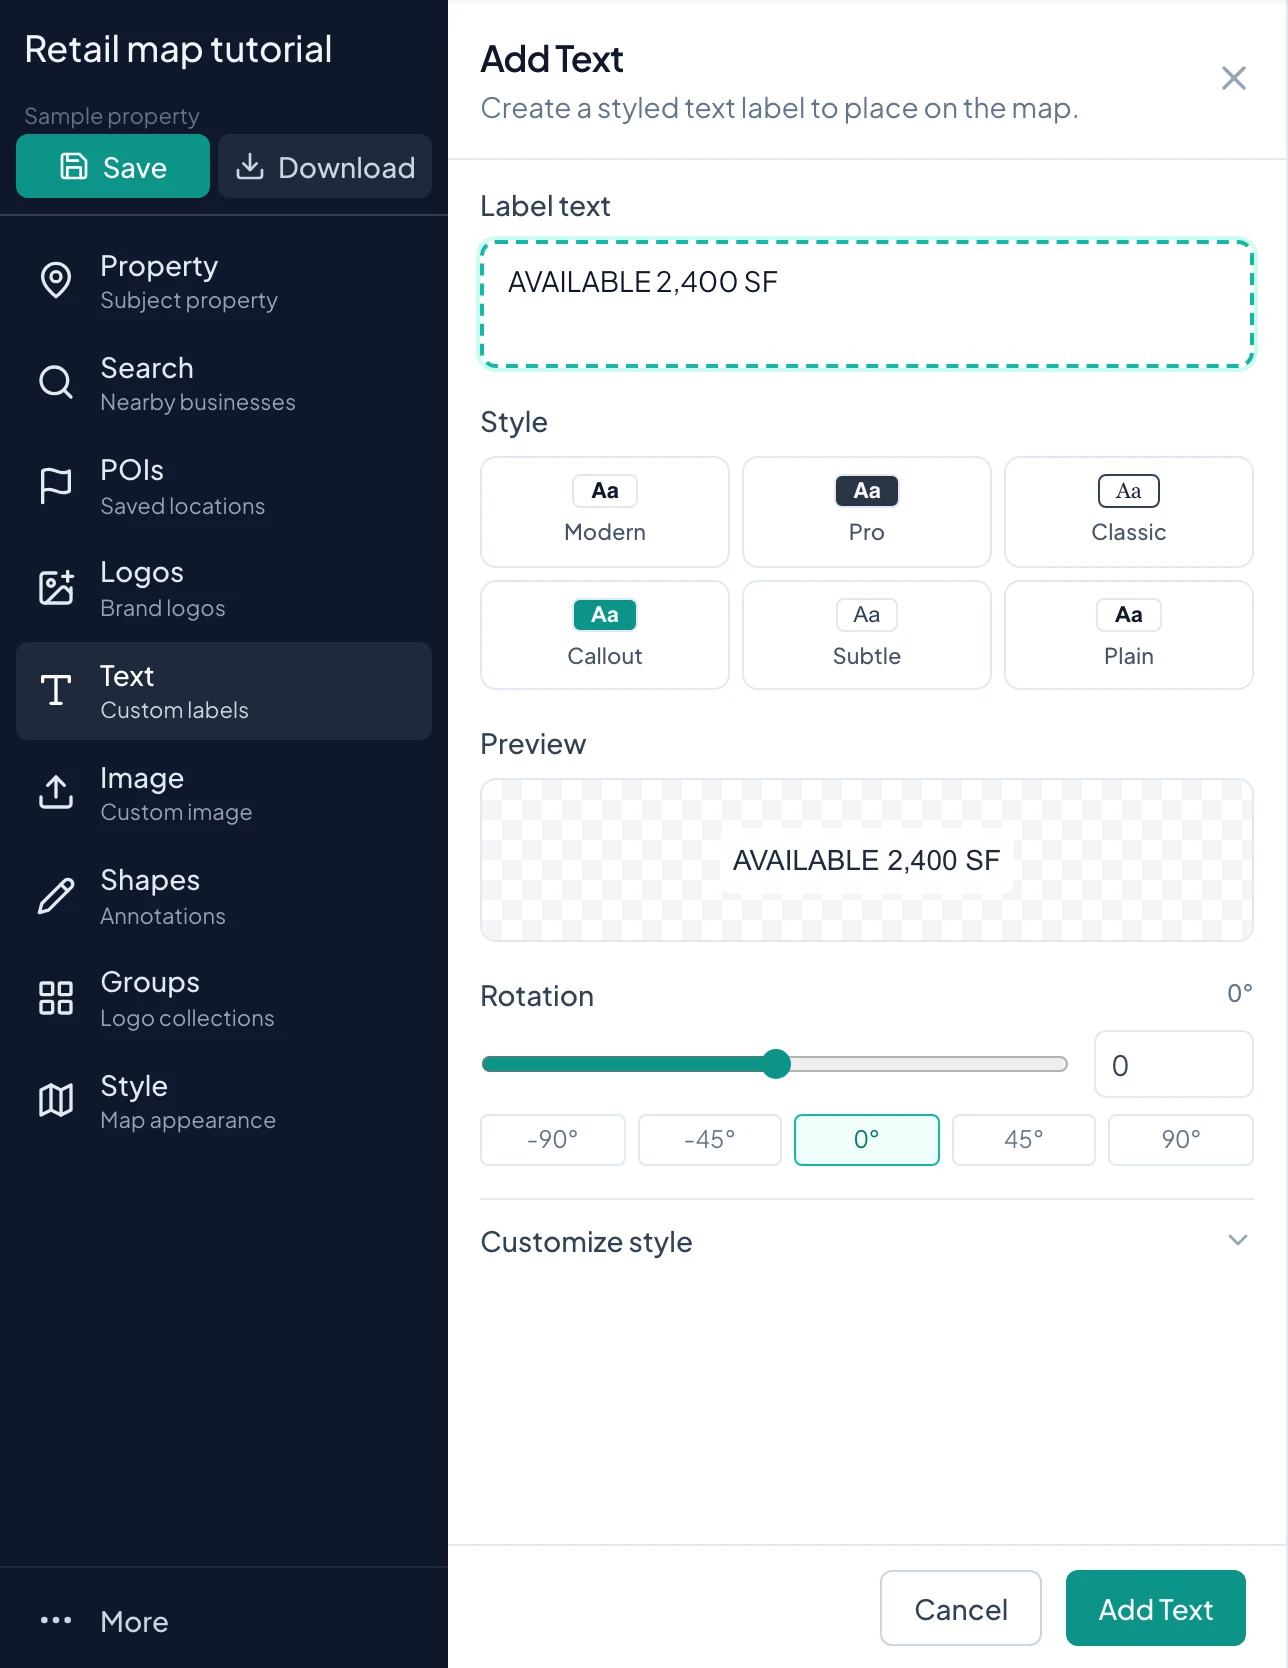
How-to 1
Choose the right kind of label
Use Text for content you write yourself: availability, a property note, a street annotation, an access description, or a short headline. Business names added from Search are business overlays, even when they display only text. This distinction matters when applying styles or reusing locations.
Decide what the reader should notice first. Use a stronger treatment for the subject or availability and a quieter treatment for secondary notes. Keep long descriptions out of the map when a few words will communicate the same fact.
How-to 2
Create a label and choose a preset
- 1
Enter the content
Open Text and click Label text. Type the final wording, including units and punctuation. For an availability callout, enter AVAILABLE 2,400 SF. The preview shows the text as you edit it.
- 2
Compare the presets
Choose Modern, Pro, Classic, Callout, Subtle, or Plain. Preview a few options before customizing. Pro here is a preset name. Choose the appearance for the role of the label, then verify it against the base map.
- 3
Apply a preset before fine adjustments
A preset changes several style values together. Select it before tuning font, colors, or padding; choosing another preset afterward can replace those adjustments. Keep the preview visible while deciding.
- 4
Place the label
Click Add Text. The panel closes and the new overlay appears on the map. Drag it into the intended display position. Adding a label does not mean the map has finished saving; check the save status after arranging it.
How-to 3
Customize the font and emphasis
- 1
Open the extra controls
Expand Customize style in the Text panel or the Edit Text dialog. The Text section contains the font picker, size, formatting buttons, and color controls.
- 2
Set the typeface and size
Choose a font from the picker and a size from the available presets. Start with a readable, familiar font. Check the full label for wrapping or unwanted height instead of judging a single word in isolation.
- 3
Apply emphasis deliberately
Use Bold, Italic, or Underline in the text editing controls. For selected wording, keep the intended text selected when applying formatting. Recheck the preview afterward so the emphasis applies to the content you intended.
- 4
Choose the text color
Select a color swatch or a custom color. Pick a color with enough contrast against the container. A brand color that works on a white page may be hard to read directly over satellite imagery.
How-to 4
Set fill, border, and padding
- 1
Start with a container style
In Container, use a Quick Style as a starting point or set the individual values. A simple backing can separate a callout from busy imagery. Use None when you want the text without a visible box.
- 2
Adjust Fill and opacity
Fill is the color behind the text. Its opacity controls how much map detail shows through. Increase it when streets or buildings make the wording hard to read; decrease it when a solid block hides too much context.
- 3
Make the border intentional
Choose a border color, set a nonzero Border Width, and ensure border opacity is visible. A selected color alone cannot show a border with zero width or zero opacity.
- 4
Set padding
Padding creates space between the lettering and the container edge. Increase it if the label looks cramped, but check that the larger box still fits. Compare the result on the map rather than relying only on the panel preview.
How-to 5
Rotate, resize, and edit a placed label
- 1
Set the angle
Use Rotation in the Text controls. Choose a preset angle or enter a value in degrees. Positive and negative values tilt the text in opposite directions. Use the preview to align an annotation with the road or feature it describes.
- 2
Resize in 2D
Use the label resize handle on the map. Resizing changes the presentation of the text box, so inspect both the lettering and padding afterward. If the wording becomes cramped, edit the text rather than shrinking it until it is unreadable.
- 3
Edit instead of replacing
Reveal the label toolbar and click Edit style. Change the content or appearance, then click Save Changes. Use Cancel to close the edit without applying the form changes.
- 4
Use the 3D width control where available
When editing a text overlay in 3D, Text box width gives you a direct width control. The standard 2D add panel does not show every control available in the 3D edit dialog.
How-to 6
Apply a consistent label style across the map
- 1
Open Text Styles
Use the floating toolbar control titled Text Styles. Its count refers to standalone Text labels. If there are none, add a label with Text before using the batch panel.
- 2
Choose the shared settings
Select a preset or set font, size, text color, background, border, and padding. Review the preview. This prepares a style; it does not rewrite the individual label wording.
- 3
Apply to the intended set
Click Apply to All N Labels. Check a short label and a long label afterward, since the same style can fit them differently. Make individual exceptions after applying the shared style.
How-to 7
Worked example: availability and an access note
Create AVAILABLE 2,400 SF with a strong preset and a visible backing. Create a second Text overlay reading ACCESS FROM MAIN STREET with a quieter style. Keep them separate so you can position each near the appropriate feature.
If the note follows a diagonal road, set its Rotation and confirm the words still read naturally. In the export preview, check the label at the size a reader will actually see. Shorten the wording, improve contrast, or move it into open space before increasing the overall output dimensions.
Check your result
The label is readable at your final map scale and does not cover the subject property or key businesses.
Tips and troubleshooting
- Use the Text Styles panel in the floating toolbar when you want to apply a consistent style to all text labels.
Read the quick walkthrough as text
- Enter your label. Open Text and type in Label text. For this walkthrough, enter AVAILABLE 2,400 SF.
- Choose a preset. Select Modern, Pro, Classic, Callout, Subtle, or Plain. The preview updates immediately. Pro is the name of a text preset here.
- Customize if needed. Expand Customize style to access font and container options. Use Rotation for angled labels.
- Add and place. Click Add Text. The panel closes and the label appears on the map. Drag it into position.
- Edit a placed label. Open the label editing controls, change the text or style, and click Save Changes. Save the map when finished.
Explore the retail map software overview for the full workflow.