Before you start
Use the 2D editor for these base-map controls. Place your main overlays before reviewing the overall style.
Watch: Choose a base style and hide map labels
Silent screen recording with captions. Sample project, current editor controls.
Read the video transcript
Open Style. Choose Light in Base Style. Check Hide All Labels to hide the base map labels. Your own overlays stay in the project.
Follow along
Step 1 of 4Choose a base style
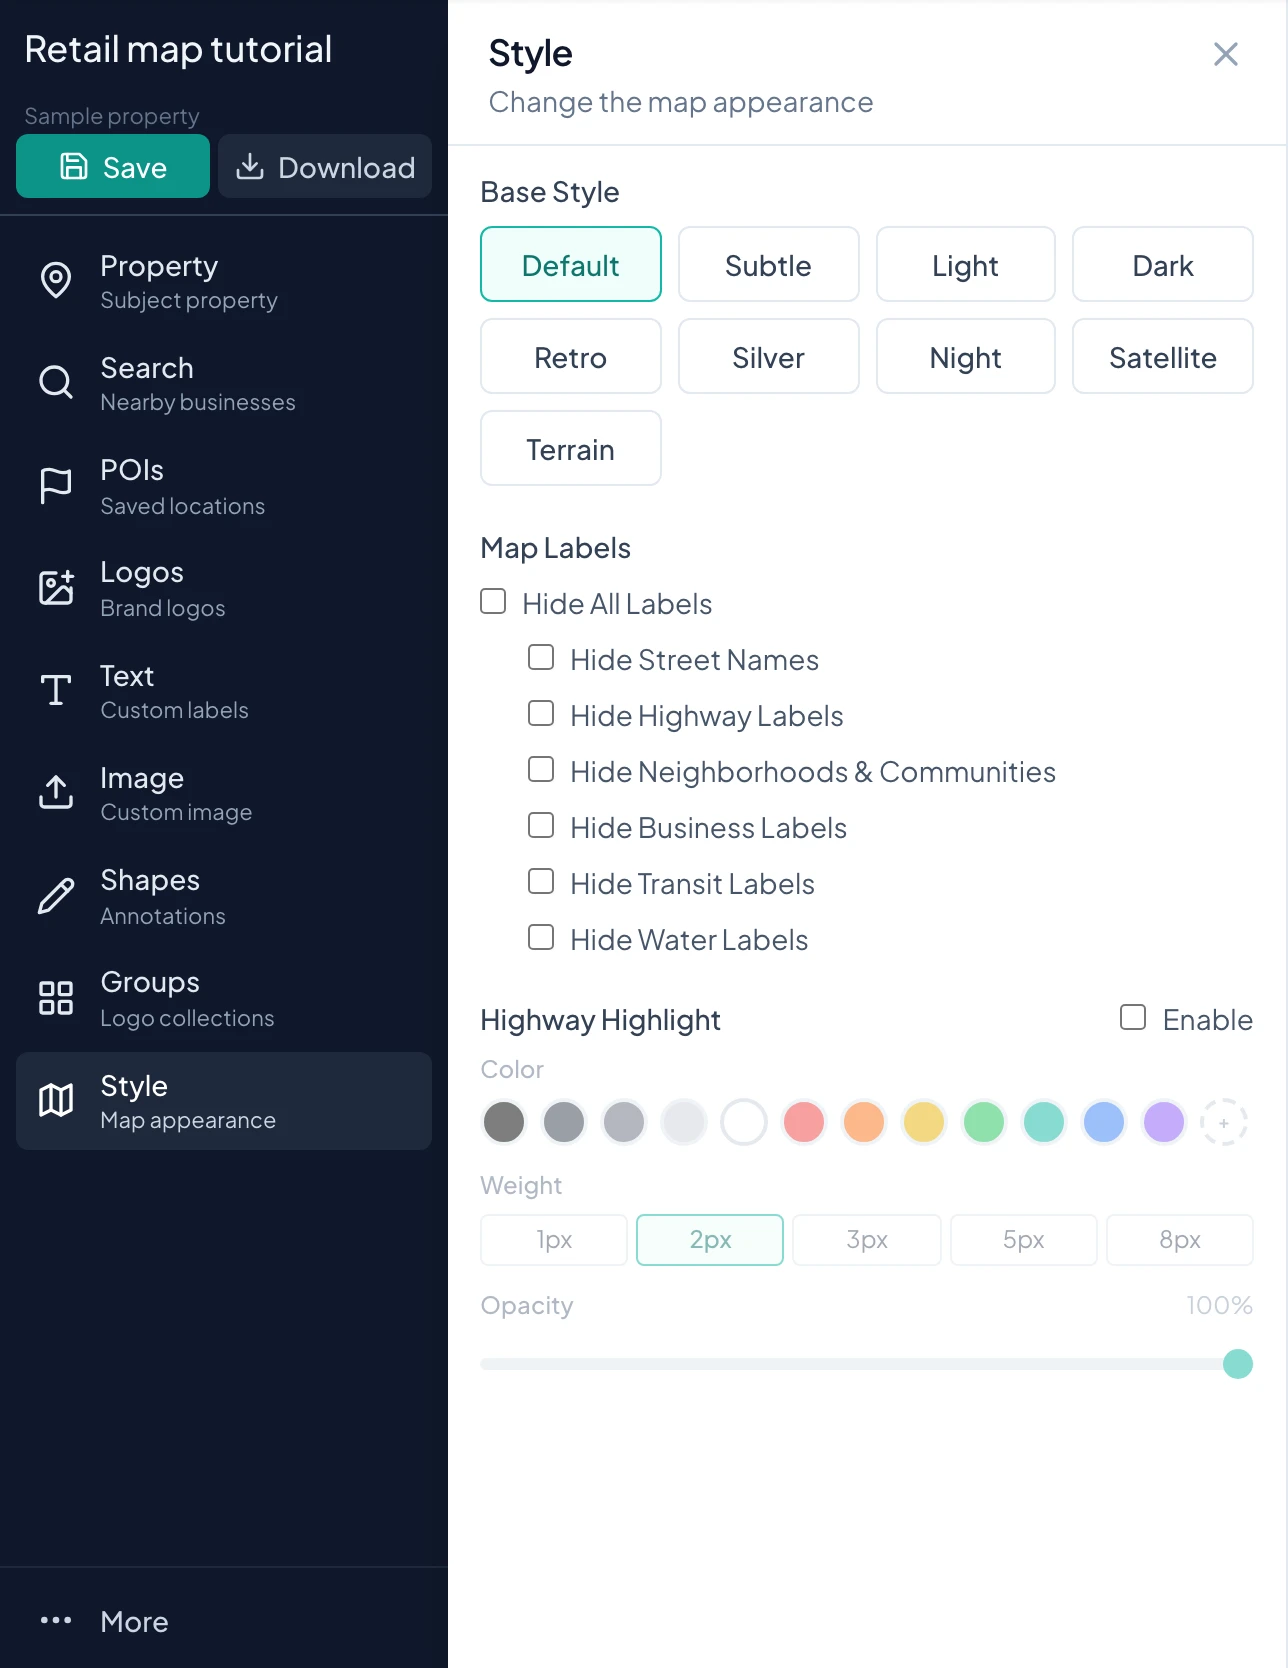
Open Style. Choose Default, Subtle, Light, Dark, Retro, Silver, Night, Satellite, or Terrain.
How-to 1
Separate base-map styling from overlay styling
Style controls the underlying map: its base appearance, provider labels, and highway emphasis. Text Styles, Image & Logo Styles, Leader Line Style, and Layer Visibility affect the overlays you added.
For example, Hide Business Labels removes the base map's business text, while a business logo you added through Search remains an overlay. Use the correct controls for the content you want to change rather than repeatedly switching map styles.
How-to 2
Choose among the nine base styles
Open Style and select a Base Style. Review the result with your actual overlay colors and final framing. The map style changes without requiring you to recreate the existing overlays.
| Style | When to try it |
|---|---|
| Default | Start with the standard map treatment and check what needs simplifying. |
| Subtle | Reduce visual emphasis from the base while keeping context. |
| Light | Try a bright background for strong, dark labels. |
| Dark | Use a darker backdrop and review light artwork for contrast. |
| Retro | Compare a muted treatment for presentation work. |
| Silver | Try a neutral base when tenant logos carry the color. |
| Night | Compare another dark treatment for the intended display. |
| Satellite | Show aerial imagery for visual building, parking, and road context. |
| Terrain | Use terrain context where it helps explain the location. |
How-to 3
Show only the base-map labels you need
- 1
Start with the master control
Under Map Labels, check Hide All Labels when you want to remove provider labels together. Uncheck it to restore the categories together, then use the individual checkboxes for a more selective result.
- 2
Control the categories
The individual controls are Hide Street Names, Hide Highway Labels, Hide Neighborhoods & Communities, Hide Business Labels, Hide Transit Labels, and Hide Water Labels. Checked means hidden. Review the map after each meaningful change.
- 3
Keep enough orientation
For a tenant overview, try hiding provider Business Labels while keeping street names. For a cleaner aerial image, remove more categories but ensure your own annotations still identify the property and important access roads.
- 4
Check overlays separately
If your own labels remain after Hide All Labels, that is expected. Use Layer Visibility for overlay categories or Edit style for a specific label. Provider labels and placed overlays are separate parts of the composition.
How-to 4
Highlight highways on a road-map style
- 1
Choose a supported base
Highway Highlight is unavailable for Satellite and Terrain. Select a supported road-map style if you need the highlight controls.
- 2
Enable Highway Highlight
Check Enable in that section. Choose a color swatch or custom color that is distinct enough to follow without overpowering the property and tenant artwork.
- 3
Set Weight and Opacity
Choose the line weight and set opacity. Start with a restrained treatment, then examine the full map. Weight controls the visual stroke; it does not describe a road's traffic volume or importance.
- 4
Confirm the intended roads
Look at which highways are highlighted at the current scale. Add a separate Text annotation if a particular corridor needs an explicit label. This control is map styling rather than a custom route-drawing tool.
How-to 5
Finish with an overlay styling pass
- 1
Unify custom labels
Open Text Styles in the floating toolbar, choose the shared appearance, and apply it to the displayed label count. Review longer labels after the batch change.
- 2
Unify artwork containers
Open Image & Logo Styles. Choose the fill, border, opacity, and padding, then use Apply to Images, Apply to Logos, or Apply to All according to the set you want to change.
- 3
Review connectors and visibility
Use Leader Line Style to coordinate business lines. Use Layer Visibility to temporarily hide an overlay category while inspecting the base. Restore the categories needed in the final composition before saving or exporting.
How-to 6
Worked example: a clean retail overview
Start with Silver or Light. Keep street names and highway labels visible, and hide provider Business Labels so the tenant artwork is not competing with a second set of business names. Give custom text a consistent dark color and a light backing.
If a freeway is central to the location story, enable Highway Highlight with a restrained color and opacity. Leave the subject marker as the strongest visual cue. Open Download and check the composition within the selected layout; a style that looks balanced on a wide editor canvas may need adjustment for a portrait flyer.
How-to 7
Troubleshoot style changes
| Symptom | Explanation and next step |
|---|---|
| A checked label option removes text | The checkboxes are named Hide. Uncheck the category you want to show. |
| Highway controls are disabled | Switch from Satellite or Terrain to a supported road-map style. |
| Custom labels did not change with the base style | Edit their Text or container styles separately. |
| The map still looks crowded | Reduce nonessential overlays or group related logos. Base styling cannot fix an overfilled composition by itself. |
| Dark artwork disappears on a dark map | Give it a lighter backing or use a more suitable source image. Verify it again in the export preview. |
Check your result
The base map provides enough context while the subject property and your labels remain prominent.
Tips and troubleshooting
- Inspect the final export preview too. A label that reads well when zoomed in may be too small in a flyer.
Read the quick walkthrough as text
- Choose a base style. Open Style. Choose Default, Subtle, Light, Dark, Retro, Silver, Night, Satellite, or Terrain.
- Control labels. Use Hide All Labels or the individual label switches. Hide Business Labels when they compete with your own tenant labels.
- Highlight highways. On a supported road-map style, enable Highway Highlight and choose its color, weight, and opacity. It is unavailable on Satellite and Terrain.
- Style your overlays separately. Use Text Styles, Image & Logo Styles, Leader Line Style, and Layer Visibility in the floating toolbar. Layers provides visibility by overlay type, rather than a list of individual objects.
Explore the retail map software overview for the full workflow.